Friday, December 31, 2010

Bourbon Currant Cookies


Yet another cookie for my Christmas cookie plate.  I really wanted to make something bourbon, but I didn't want a bourbon ball.  So I looked at the indices of a couple cook books and I found these in Martha Stewart's Cookies.  They seemed Christmasy enough and I really like that cookbook, so I didn't mind that I was trying a new recipe in a bit of a time crunch (I had to finish all the plates by Christmas day, and I was making these on the afternoon of the 24th.)

They were very, very good.  However, I think 'cookie' may be a bit misleading.  They were cookies, don't get me wrong, but the dough, the taste, and (to some extent) the texture, were scone-like.  That isn't a complaint, mind you, just an observation.  They were excellent...almost like a boozy scone crossed with a nice butter cookie.  

Thursday, December 30, 2010

Coconut Almond Macaroons

Another Christmas cookie.  These are almost like the coconut macaroons I make normally, but with a bit less sugar and some almond extract.  They don't taste too almondy, just a hint of almond comes through.  I personally don't like my macaroons to be too sweet, so I cut way back on the sugar.  (Well, I also cut back on the sugar because I use sweetened coconut, which I think is almost enough sweetness.)

Very soon I'm going to make them with chocolate drizzled on them or perhaps chocolate chips mixed in.  When I do, I'll post the whole recipe, because by then I'll have perfected it.

P.S. No photo for these either, because they look just like the other coconut macaroons I made, and you can see them on the cookie plate.

Wednesday, December 29, 2010

Cream Cheese Mints, take two

  
Oops, the photo came out quite faded...that's odd, it shouldn't be.
Another Christmas cookie: my cream cheese mints.  I'm not going to write much because I have actually posted the recipe for these already.  You can see it here.

For this batch I used about 5-6 (I think) drops of red food coloring to get the pink color.  Aren't they pretty?!

Tuesday, December 28, 2010

Gingerbread Christmas Cookies

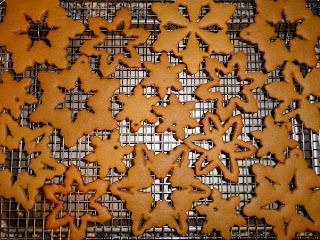
The first cookie on the plate was gingerbread cookies...a Christmas classic.  I used the same gingerbread dough I used for the Christmas tree cookies to make these.  However, I left off the icing, because I thought they tasted better plain.  To make them I just used the smallest snowflake cutter and made a ton of the 1.5in (or so) diameter cookies.  A perfect size for a cookie plate, I think--they aren't so big as to overwhelm the rest of the cookies, nor are they so small as to get lost.

P.S.  I forgot to take a photo of these separately, sorry.  But you can see them on the plate or the tree (this batch didn't have the holes for hanging, of course).

Monday, December 27, 2010

Christmas Cookies


Over the next few days I'll be blogging about the Christmas cookies I made.  You see, every year I make a variety of cookies to give a gifts.  This year I made (clockwise from top), brownies, bourbon currant cookies, my cream cheese mints, gingerbread cookies, and (center) coconut macaroons.  I think that gave a pretty diverse selection of flavors while still keeping in the Christmas-y cookie tradition.  And they looked so nice together too!

Cookies are wonderful to give as gifts (and to receive, I'd imagine).  I just arrange them on a white paper plate and wrap in plastic wrap.  Either I tape the ends of the cling wrap together under the plate or tie them with ribbon on the top (though, that's a bit of a pain because usually you have to use two very long strips of the cling wrap to get the plate wrapped properly, so I don't tend to do it the ribbon way.)

By the way, when picking cookies to put together there are no firm rules (at least that I'm aware of).  I personally like to do one really chocolaty thing, at least one crunchy/crisp cookie, and one soft/chewy cookie.  In addition, I like having one that is slightly unusual and one that is pretty common.  Of course these can overlap...for example a chocolate brownie would be a chocolaty, chewy, and common cookie.  Don't ignore brownies or other bar cookies--cut into small squares, they count as a cookie for the purposes of a cookie plate.  I tend to avoid cookies with nuts unless I'm sure the person I'm giving them doesn't have nut allergies.  I also like to include at least one gluten free thing in case of someone being celiac (though that may just be because I know enough many people who can't eat gluten that now I'm used to making gluten free things.)

Sunday, December 26, 2010

Oh Christmas Tree, con't

    
The tree (note all the popcorn and dried cranberry strands in addition to the cookies.)
Here are the promised photos of our Christmas tree and its cookie ornaments!

The gingerbread cookies are some of my favorite gingerbread cookies to eat.  I found the recipe on the food network website by searching "gingerbread cookie ornaments," so I wasn't expecting them to taste great, but they really do!  They were pretty easy to make, but I found that the dough was very finicky and worked best the next day (even though the recipe only said that the dough needed to be chilled for a few hours.)  I found the cookie cutters I used at a Williams-Sonoma outlet.  It's a set of three nesting snowflake shaped cookie cutters (in small, medium and large) and two accent cookie cutters (very small diamond and chevron, to cut out details from the snow flakes.)  They were so much fun to play with because you can make a ton of different, pretty patterns.  

I left some of the gingerbread cookies plain and iced some with royal icing that I sprinkled with sugar while it was still wet.  I found the icing difficult to use, so I ended up doing mainly patterns with dots (which are easy enough).  Honestly, they looked great that way!

Gingerbread ornaments awaiting their icing.
Iced gingerbread cookies.  Aren't they pretty?!
The sugar cookies with "stained glass" windows were made using special cookie cutters (also from Williams-Sonoma, but not the outlet.)  I made the cookies using the recipe that came with the cookie cutters.  The dough (and subsequent cookies) was delicious and actually had cream cheese in it.  I've never seen a sugar cookie recipe that calls for cream cheese and I don't know why--they were amazing!  

The trick is that the cookie cutters, which are shaped like ornaments (with a hole for hanging them and everything) cut out decorative holes that you fill with crushed hard candy.  When they bake, the candy melts and forms a colored sugar window.  They are incredibly tedious to make because you have to be so careful filling the holes just enough, without getting any candy on the cookie, or it will get stained too.  They're worth the effort though, I think.  I mean, they look beautiful on the tree!

A close up of the one of the sugar cookies with "stained glass" windows.

Friday, December 24, 2010

Buttermilk Biscuits


This is the last belated Thanksgiving post, I promise. 

I found the recipe on the food network website (as it turns out I now have 2 or 3 buttermilk biscuit recipes from the 9 new cookbooks I got for Chanukah, ah well.)  I'm actually glad I had to search for this recipe, because oh wow they were good!  They were relatively simple to make and they came out perfectly.  They were buttery and flakey and tender and soooo good with cranberry jelly and turkey on them!   

Thursday, December 23, 2010

Chocolate Pecan Pie

  
You can actually see the chunks of chocolate and pecans!  (Not to mention, the rich dark chocolaty center...yummy!)

I actually made this for Thanksgiving.  It was VERY good.  If you don't mind (well, even if you do, I suppose) I'm not going to say too much about it, since it's been so long since I made it.

The recipe is from the cookbook Death By Chocolate, so, as one can imagine it was very chocolaty.  The pie crust dough was easy to make and even easier to work with.  The only problem it made too much of the filling and then the filling that did fit in the pie shell puffed up insanely in the oven.  It wasn't supposed to look like a quasi-souffle, but it tasted wonderful, so who cares!

Oh, by the way, I was able to make it the day before and let it chill overnight (which the recipe recommended) so I didn't have to worry about using the oven on Thanksgiving day, which was very nice.

Wednesday, December 22, 2010

Chocolate, Orange, Chestnut Trifle, con't

   
Sorry, the color came out oddly faded when I uploaded the photo...I have no idea why...

Here's the photo of my chocolate, orange, chestnut trifle.  Doesn't it look wonderful?  I love the orange zest on top (not my idea, Giada suggested it in the recipe).  Yummmmmmm.

Tuesday, December 21, 2010

Oh Christmas Tree

I did something insane this year.  I talked my mom into decorating our 8-foot Christmas tree/Chanukah bush with cookies instead of real ornaments.  This entailed making an insane amount of cookie ornaments. It took a LONG time.  But it was worth it...the tree looks amazing!

I'll put up individual posts about the different cookies I made, but here's an overview:

I made gingerbread snow flakes (with the coolest cookie cutters ever).  Some with royal icing, some without.  And hung them with cream ribbon.  I also made sugar cookies in ornament shapes with 'stained glass windows' (with the second coolest cookie cutters ever).  I used green and red candy to make nice christmasy windows.  I hung them on deep brown ribbon to contrast with light cookie (and with the dark gingerbread/cream ribbon ornaments).

I'll post more about the cookies and photos of the tree soon, but I'm tired tonight, so you'll just have to wait until tomorrow!

Monday, December 20, 2010

Chocolate, Orange, Chestnut Trifle

I saw this recipe on Giada de Laurentiis' cooking show and thought, "I have to make this for Thanksgiving."  So I did!

I used my pound cake instead of store bought, but other than that I followed her recipe (with the slight exception of not having enough orange liquor and having to use part liquor part simple syrup, rather than one or the other like she says).  I've only made one other dessert of hers and it didn't come out great, so I was slightly hesitant, but this was wonderful!  It came out perfectly.  And it was relatively straight forward, albeit a little tedious, to make.  Perhaps the best thing is, if you make the cake in advance or buy it, it doesn't use the oven so you don't have to worry about timing it around the turkey!

Basically, it is a layer of pound cake soaked with orange liquor or simple syrup (or, in my case, both), then a layer of chestnut whipped cream, a layer of imbibed pound cake, a layer of chocolate-orange whipped cream/mousse, cake, chestnut, cake, chocolate.  Yum.

As for the taste, my mom and pops loved it.  I really liked it but, as it turns out, I'm not a huge fan of chestnuts.  I'd only had them once before in a dish with green beans, brussel sprouts (which I hate) and chunks of pancetta, and I liked them, but I think they were rather disguised by wonderful flavor of the pancetta.  I digress.  Still the orange and chocolate and pound cake was incredible together.  And I didn't mind the chestnut layers, I just wasn't crazy about them.  I may have to make this again without the chestnuts.  Perhaps I'll substitute orange whipped cream.  Or better yet, just use more of the incredible chocolate-orange mousse.  I'll let you know if I do!

By the way, I'll post a photo soon, I promise.

Saturday, December 18, 2010

Pound Cake

Ok, this is a belated Thanksgiving post...sorry it's sooo belated!

This is the same pound cake I made last year.  It's very, very good and not overly difficult.  So I figured, why mess with things on a holiday...I should just stick with what I know will work.  As anticipated, it worked and was as good as I remembered!

I did add a bit extra orange zest, because I made it to go in an orange, chocolate, chestnut trifle (which I'll post soon).  I'm going to spoil the surprise a little:  the pound cake worked perfectly in the trifle!  (Of course, last year it worked perfectly in the New Year's Eve Trifle, which, albeit, was very different.)

I'm not going to post a photo.  If you want to see what it looked like check out old "homemade pound cake" post.  They look exactly the same!

Thursday, December 16, 2010

Coconut Macaroons, take two


I made these at the same day I made the chocolate rice crispy brittle to bring to my class...both recipes are gluten-free, dairy-free and nut-free so they are perfect to bring into class (since pretty much every one can eat them).

They are the same coconut macaroons I made quite some time ago.  I just didn't dip them in chocolate this time.  They were very good, even without the chocolate.  And, since my oven is working properly, they got nice and golden on the edges.

Tuesday, December 14, 2010

Chocolate Rice Crispy Brittle, con't


Here's the photo of the chocolate rice crispy brittle...it doesn't do them justice!

Chocolate Rice Crispy Brittle

Yes, I know the name sounds odd...  They were meant to be chocolate rice crispy treats (from Francois Payard's cookbook) but I did something wrong and they set too hard during the cooling phase.  I think it was either that the marshmallows were a little stale or that I over mixed them causing the marshmallows causing them to harden into candy.  Either way, I had to soften the whole thing in the oven and spread it out in a thin layer on a baking sheet.  When it hardened again, I broke it into chunks (like you can with peanut brittle or candy of that nature).

Let me just say, I am really glad they didn't come out right, because they were amazing!!  They were intensely chocolaty (they have cocoa and melted semi-sweet chocolate in them)  and not overly sweet.  I brought some into class and they were very popular, so this isn't just me thinking it was good...there seemed to be a consensus.

P.S. I'll post a photo later tonight.

Monday, December 13, 2010

Cranberry Pecan Rye Bread, con't, con't

I'm back!  I survived the end of the semester craze and I'm ready to blog.  I actually have been baking, just not writing about it, so I have some catching up to do.

In any case, I'm finally going to tell you about the bread I made.

It was amazing!  I've never made bread and, as it turns out, it isn't scary, it's so much fun.  I admit it has it's dull moments...I'm not terribly patient and you have to wait so long for it to rise, but that's OK, it's worth it!

The recipe, from Martha Stewart's Baking Handbook, was very easy to follow and relatively simple.  The only problem was, the instant yeast didn't wake up properly when I followed her directions to activate it, so I wasted 2 packets of yeast and some time.  Then I had to follow the yeast's instructions on how to activate it, which worked perfectly, but meant I had to modify the bread recipe (because I had to dissolve the yeast in less water than she called for and some sugar.)  Ah well, it all worked out.


The bread was great.  It was the perfect rye bread, soft on the inside, chewy on the outside.  The cranberries and pecans were incredible in it.  And I really liked the maldon sea salt on top, though I think there was a little too much.

Tuesday, November 30, 2010

Sorry I haven't been posting...

Honestly, I'm not actually going to apologize for not posting.  I had a terrible week last week.  I mean really awful.  And the last thing I felt like doing was blogging.  I'm back now.  Unfortunately, this week and next week are going to be insanely busy with school work.  So I won't be baking too much for the next couple weeks.  But I'll hopefully have time to post about what I made for Thanksgiving and, finally, tell you about the bread I made.

Monday, November 22, 2010

Cranberry Pecan Rye Bread, con't


Ok, the first chapter of my thesis is officially finished and handed in.  But I'm really exhausted, so you're not going to hear about the bread, but you do get a picture!

Don't worry though, it's Thanksgiving break.  I'll be baking a lot and I'll have at least a little time to post.

Thursday, November 18, 2010

Cranberry Pecan Rye Bread

This Sunday I made bread for the first time ever!  On Monday my thesis advisor told me I had to have a draft of the first 25 pages written by this coming Monday.  In other words, I suddenly had no time to write about my bread.  I still don't, but I felt bad that I completely stopped posting without explaining why.  Now that I've told you why, I hope you'll be patient with me.  I should have some time soon to post a least a photo of the bread and I will definitely tell you all about it after I hand in the first draft of the first chapter of my thesis.

Sunday, November 14, 2010

Brown Sugar Pound Cake, con't


This really was great!  It wasn't muffin-y at all, which, considering it's pound cake, is a good thing!  It was dense and moist and the taste was incredible.  It was sweet, obviously, but it had a really complex flavor because the only sugar was brown sugar.

I sliced one cake into thin slices to bring to my class tomorrow and kept the other.  We've been devouring it with raspberry jam (and I think I'm going to try it with apricot jam for dessert tonight.)  YUM!

Saturday, November 13, 2010

Brown Sugar Pound Cake

This is from Martha Stewart's Baking Handbook.  It is not a traditional pound cake, both in that it is made with brown sugar rather than white sugar and in that it is not made with a pound of each of the 4 ingredients.  Traditionally a pound cake (or quatre-quart) is made with a pound each of butter, sugar, eggs and flour, often with baking powder and vanilla extract added.  This was made with much less butter and fewer eggs and some buttermilk for extra fat and liquid.

Interestingly, the batter resembled muffin batter, I'll have to see if the taste and texture are muffin-like as well.  I'll see this later tonight or tomorrow, but the cakes (it makes two pound cakes) are still in the oven and I'm tired so I may wait till tomorrow.  Even if I do have a taste tonight, I will certainly not blog about it until tomorrow...sorry!

Friday, November 12, 2010

Chocolate Coffee Cake, Take 2, con't


Here's the photo of the Greek yogurt Chocolate Coffee Cake!  Sorry, it didn't come out great, my camera battery was dying and I didn't want to wait for it to recharge, so I just snapped a few shots.  But let's face it, it's coffee cake, it doesn't need to be a perfect picture.

Wednesday, November 10, 2010

Chocolate Coffee Cake, Take 2

On Monday I posted a Chocolate Coffee Cake I made ages ago because I was planning on trying out a new coffee cake recipe.  Well, then I got to thinking that I really did want chocolate and I loved the chocolate coffee cake...so I made the chocolate coffee cake again.  But with some major changes.

Ok, maybe 'major' isn't the right word, but they were significant.  I substituted fat free Greek yogurt for the full fat sour cream the recipe calls for.  I did this for 2 reasons.  First, I didn't have sour cream and I didn't feel like going to buy some.  Second, and more importantly, I really wanted to reduce the fat content of the cake and this seemed like the best way to do it.  I don't like fat free sour cream...it just doesn't resemble sour cream in either texture or taste, so I refuse to use it.  I could have used plain fat free yogurt (which I believe is a common substitution for sour cream) but it has such a runny texture and not enough tangyness, in my opinion.  So I used fat free plain Greek yogurt, which has a similar texture to sour cream and it's tangy.  It worked really well, if I do say so myself!  The cake was slightly drier, but not too dry by any means.  Other than that, I really couldn't taste a difference.  (Granted it's been a really long time since I had the normal, sour cream version, so there could have been more of a difference and I just don't know because I don't remember it well enough.)

The other change I made was to leave out the chocolate chips from the topping.  That wasn't because I don't love the chocolate chips, but I figured it'd help with the reducing the fat goal.  I did make 50% extra crumble to replace the chocolate chips and because I love the crumble.

Overall really good! (And all the people I fed this to agree!)  I think I shall have to try this again but substitute egg whites for the whole eggs the recipe calls for.  

P.S. I'll post a photo tomorrow.

Monday, November 8, 2010

Chocolate Coffee Cake


This is a recipe from a Williams Sonoma cookbook called Muffins. My mom says that this cookbook, since it is entitled Muffins, should only have muffin recipes.  However, to her dismay, it also has coffee cake and quick bread recipes.  This actually makes perfect sense; they are to muffins as cakes are to cupcakes.  In other words they are like giant muffins.  Quick breads and coffee cakes are not terribly similar, but they are both like different types of muffin recipes.  The quick breads are like the less rich muffins, such as zucchini muffins.  The coffee cakes are along the lines of more desserty, caky muffins.  They are made with similar batters and have similar crumble toppings.

This particular coffee cake is a really nice, moist, flavorful chocolate sour cream cake with a buttery brown sugar and chocolate chip crumble. The crumb is moist and relatively fine.  It has a lovely tanginess from the sour cream and, while clearly sweet, is not overly sweet because the chocolate flavor comes from unsweetened cocoa powder.  Yum!

P.S. I actually made this cake quite a while ago, well before I had this blog.  I'm posting it today because I am planning on making coffee cake tomorrow, so it seemed timely.

Sunday, November 7, 2010

Strawberry Coffee Cake Muffins


Ages ago I promised I'd make a nectarine version of Martha Stewart's Plum Coffee Cake Muffins.  Well I didn't.  But I did decide to make a strawberry version.  They were good!

I think I like the plum version slightly more, because the plums were more flavorful (though that might be a reflection on the quality of the strawberries more than on the quality of the muffins.)  But I still loved them.  They are moist and tasty and every so slightly crispy on top (from the cinnamon sugar topping).  The fruit doesn't make them soggy and doesn't sink all the way to the bottom, which is excellent.  The trick to the former is to dry off the fruit after you cut it.  The latter is achieved by spooning batter into the muffin cup to fill it about half way, putting the fruit in, then topping it with more batter (rather than folding the fruit into the batter before you scoop it into the muffin cups.)  I do think I filled them a little too high before I put in the fruit, but I didn't mind because I really like the fruit-less parts!  I think I will have to try these again with better strawberries and perhaps some mini chocolate chips!

Saturday, November 6, 2010

Quadruple Chocolate Loaf Cake with Vanilla Custard Sauce

I made this last weekend to bring to a, for lack of a better word, dinner party (but is only 4 people a party?).  The cake was from Nigella Lawson's cookbook, Feast.  The custard sauce was from her cookbook entitled How to be a Domestic Goddess.  The cake was excellently moist and chocolaty.  I was going to serve it as a whole cake, but I changed my mind and cut it into cubes.  Because I did that, I really needed to serve it with something.  So, I made the custard sauce, which is just to say creme anglaise.  I just served it with some fresh strawberries.  YUM!

What is great about this is it travels well.  I put the cake cubes in one tupperware and the custard in another.   And brought a pint of strawberries.  Just serve in three separate bowls and let everyone take what they want.

P.S. Sorry, I completely forgot to take a picture!

P.P.S. Don't listen to Nigella about using plastic wrap to line the pan...use parchment instead.  The plastic melted a bit (I know she says it won't, mine did, perhaps the plastic wrap she uses is more heat resistant than mine.)  It was a nightmare to clean off my lovely loaf pan.

Thursday, November 4, 2010

Two Berry Chess Pie, con't

    
It looked better in person, but it wasn't terribly photogenic.
As promised, the second installment of Paula's Chess Pie.

Well, it tasted even better cold!  In fact, I'd venture to say that it tastes better than it looks, and I think it looks pretty darn good!

Wednesday, November 3, 2010

Two Berry Chess Pie

When I saw Paula Deen, she was signing cookbooks.  So I bought a cookbook for her to sign.  This recipe is from it.  I've only ever made one of Paula's recipes (her Dummy Fudge) and it came out well, but, as much as I love Paula, I was a little hesitant.  I shouldn't have been.  It was simple to make and absolutely amazing!!!!

It was quite a straight forward recipe.  I made a graham cracker crust (but I think Paula uses a store bought one), made the very simple custard filling (which doesn't involve cooking, since it gets baked), and baked it.  Then after it was cool (well luke warm, I was impatient) I topped it with berries and a glaze made from melted apricot jam (Paula adds liquor to it, but all I have is Frangelico, which wouldn't have worked well, so I left it out).  It's supposed to be fully cooled before you eat it but I didn't want to wait (nor did my mom or pops).  It was great!  I can't wait to taste it cold.  When I do (probably tomorrow night for dessert, if I can wait that long) I'll let you know how it is.  I'll post a photo then, by the way.

Tuesday, November 2, 2010

White Chocolate Pistachio Rochers


I had left over white chocolate from the white chocolate covered apricots so I made these.  I figured white chocolate would go nicely with pistachios, I was right!  They were really excellent.  The sweetness of the white chocolate paired perfectly with the nutty, exotic pistachios (well, maybe not exotic, but you get the point).  I'd say more, but they were so simple that I feel I should keep this simple.

Monday, November 1, 2010

White Chocolate Covered Apricots


These were really very nice.  Overall I'm not a white chocolate fan (I like it, I just don't love it the same way I love dark chocolate) but I thought the sweetness would pair nicely with the tartness of the dried apricots.  I was right!

These were incredibly easy to make.  I melted a small amount of white chocolate (in the microwave, checking every 20 seconds or so).  Then I dipped the apricots in the chocolate taking care to not make the chocolate too thick (but still trying to coat them fully).  I didn't feel like dealing with coating the whole apricot, but instead just coated about 2/3-3/4 of them so I could hold them and dip without getting too messy.  I let them harden on a Silpat, but parchment paper would work just as well.

The white chocolate didn't harden terribly well, so I ended up getting impatient and putting them in the fridge.  It worked!  (And didn't even make them streaky like it can do with untempered dark chocolate.)

Sunday, October 31, 2010

Halloween Cut-out Cookies

    
Aren't they so cute?!
These are made with the same butter cookie dough I used for the iced butter cookies.  Yum!  However, I did things a little differently this time.  I dyed one batch orange (using food coloring) and a second batch brown with coco powder (I substituted 3 tbsp coco for 3 tbsp flour) and a few drops of black food coloring.  I used new cookie cutters I found.  They're mini pumpkins, ghosts, bats and cats.  The former two I did with the orange dough, the latter with the chocolate dough.  I didn't bother icing them, because they were too tiny and really good plain anyway!

Saturday, October 30, 2010

Chocolate Caramels with Fleur de Sel


Just in time for Halloween, we have caramels!

I have seen many caramel recipes with fleur de sel, but this is particularly good because it adds chocolate to the mix. It is from Chocolate Epiphany, by François Payard with Anne E. McBride, an excellent cookbook all about chocolate desserts.

Anyway, back to the caramels.  They are chewy but not overly sticky and tough.  The taste is smooth with an undertone of chocolate. (The recipe calls for milk chocolate, but I’m not a huge fan of milk chocolate, so I used semi-sweet which I’m sure changed the taste slightly, but I’m not complaining). The fleur de sel (french sea salt) brings out the chocolate while balancing the sweetness of the caramelized sugar. This is all just a long-winded way of saying they are really good! I don’t think I’ll ever eat a store bought caramel again.

Thursday, October 28, 2010

Whole Wheat and Plum Cake, con't


Oops, here's the picture of the whole wheat and plum cake I promised ten days ago!

I'm back!

Sorry I fell off the face of the world last week!  I've been in midterms, which have required my nearly undivided attention.  As such, I've barely had time to bake let alone blog.  But midterms are now over, thank goodness, and Halloween is upon us so I'll be baking and blogging plenty in the next few days and then things will hopefully get back to normal.

Tonight I'll be posting something, I promise, so stay tuned!

Monday, October 18, 2010

Whole Wheat and Plum Cake

I found the recipe for this in the New York Times more than a month ago and I've wanted to try it since then.  However, I was out of whole wheat flour and I only just remembered to buy it, so I only just got to make it.  It is really good!  The cake is soft and fluffy and the whole wheat flour adds a nice nutty-ness.

I took their suggestion and used two different varieties of plums (black and red plums, to be precise), which was very nice. You actually top the cake batter with the plums rather than mixing them in so it is similar to a frangipane (because the fruit is baked into the cake, but only on the top layer--not because it tastes at all like one).

It's really quite good and actually healthy (as cakes go, anyway!)  It looks nice too, but you'll have to take my word on that for now, because it is late and I don't feel like uploading photos.  I'll post them tomorrow, I promise!

Sunday, October 17, 2010

Chocolate Orange Brownies

These are another adaptation of the Roland Mesnier brownies.  I used his basic recipe (without nuts or chocolate chips or the glaze on top) and added some orange zest to the butter and sugar when I creamed them together.  Then I added one half teaspoon of orange extract to the batter along with about a third of the vanilla that the recipe called for.  I guess that at this point they really aren't the Roland Mesnier brownies (having left out some ingredients and added others) but I still made them with his book open, so you can see why I still call them a variation on his recipe.

Anyway, they came out wonderfully, still chocolaty with a wonderful orangey flavor.  I'm a huge fan of chocolate orange anything, and a huge fan of brownies (as you may have noticed) so these are a hit with me!

P.S. I didn't bother with a photo, since they look exactly the same as the regular Roland Mesnier brownies, or for that matter as the Mexican Hot Chocolate Brownies.

Saturday, October 16, 2010

Chocolate Nut Biscotti


Since I didn't post anything yesterday, I figured I'd post twice today.  So here we have chocolate nut biscotti.

I love biscotti!  These are from Martha Stewart's Cookies, and are very good, though they aren't as good as the amazing biscotti made by our friend Sandra.  But, then again, these quite are different, so I wanted to give them a try.

They are a chocolate cookie with chocolate chips, pistachios (not a traditional nut for biscotti, but I love them) and hazelnuts mixed in.  Plus a little orange zest is added to the dough, this doesn’t make the biscotti taste orange-y, it just adds an extra dimension to the flavor.

Chocolate Cake with Whipped Ganache Icing


I made this using the left over layer of chocolate cake from the Birthday Cake.  It was very good!  Basically, I used the left over whipped dark chocolate ganache (of which there was a lot) to ice the cake.  I didn't even try to make it smooth looking, instead I decided to give it a nice textured look.  It's really easy to get this look, all you have to do is spread on a think layer of a smooth, creamy icing (not stiff buttercream, like I used for the other cake).  Then, using an offset spatula, swirl the icing.  Don't worry about it being neat, it is supposed to look messy, that's the beauty of it!


You could stop at this point, the cake looks beautiful and delicious plain.  However, I wanted to practice my decorating technique before I started on the big cake, so I did it on this one.  I think it came out looking really beautiful.  If you want to know how I made the icing just click here.

Thursday, October 14, 2010

Oops and Chocolate Covered Peanuts and Raisins

Oops, I didn't post yesterday.  I forgot, sorry!  Anyway, this is what I was going to post yesterday, had I remembered:

This is a great way to wrap them to give as a gift; just cut the top off a plastic baggie and tie with ribbon. 
Last week, I made dark chocolate covered peanuts and flame raisins.  It was very easy but tedious.  Basically, I melted chocolate and dipped each nut and raisin in it individually.  To dip the nuts I put a little chocolate in a spoon and rolled the nut (or raisin) around until it was completely covered.  Then I put the chocolate covered nut/raisin on a baking sheet covered with parchment paper.  It's that simple!  (It just takes a long time.)  All you have to do is be patient and let them harden at room temperature.  At this point, I decided to mix the two, but by all means keep them separate.

By the way, I used peanuts and flame raisins (fancy raisins, I'm assuming 'flame' comes from the fact that they are made from red grapes), but you can used any nut or dried fruit you want.  Obviously if you use a larger nut or fruit, dipping rather than rolling the nut in chocolate might be more practical.  And of course you can use other types of chocolate.  Some other parings I recommend: white chocolate and pistachios or dried apricots, milk chocolate and cashews (actually my aunt's recommendation, not my own idea, I've never tried them, but they sure sound good!), and dark chocolate and pecans or dried cranberries, to give a few ideas.

Tuesday, October 12, 2010

Fudge, con't


Fudge is great to give as gifts because, well, who doesn't like fudge?  I cut the fudge into 1in squares and stacked a chocolate peanut square and a peanut butter square in the center of a square of cling wrap and then tied the wrapping with a small piece of curling ribbon.  Simple as that!  Simple, but it took me over an hour to wrap 30 of these.  They were quite a hit, let me tell you!

Monday, October 11, 2010

Chocolate Peanut Fudge and Peanut Butter Fudge


Last week I made two batches of fudge to bring into class on Thursday and to my old high school on Friday.

I made Paula Deen's chocolate dummy fudge with peanuts (instead of pecans, to go with the next batch, you'll see why in a minute!)  It is a wonderfully easy recipe, hence the name, and it is really, really good.

I also wanted to experiment with a more traditional fudge recipe, so I looked on the Food Network website and found a recipe for Peanut Butter Buttermilk fudge.  It isn't the really traditional type made on a marble slab, but it is still boiled sugar and liquid (buttermilk, in this case) brought to soft ball stage.  It was fun!  I've never made candy that has been sugar based, so I've never fiddled with soft ball stage or the others before.  Have I mentioned, I had fun?!  This is really good fudge as well, and really peanut buttery!


The two different fudges have really different textures, and not just because the chocolate fudge had nuts.  The chocolate fudge is creamy and needs to be kept refrigerated or it goes all gooey.  The peanut butter fudge is slightly less creamy and a tad bit dryer.  It doesn't need to be kept in the fridge, though kept it there with the chocolate peanut fudge, because it is much more convenient.

Tomorrow, I'll post how I wrapped these to give as cute little goodies to all the teachers at my old high school!

Sunday, October 10, 2010

Birthday Cake, step 6


This is the last step: decoration!  Honestly, you should feel free to do whatever you want to do at this point.  What I did, is made a new batch of buttercream and divided it up.  I put a small amount aside and dyed it yellow to make the centers of the flowers (unless you are completely covering the cake with flowers, you shouldn't need much at all).  I then took somewhere between 1/3 and 1/2 of what was left and dyed it green to make the leaves.  I dyed the rest a pretty pink (using red food coloring).

Now for the fun part.  I fitted one pastry bag with a large closed star tip (with six points) and filled it with pink icing.  I fitted another with a small drop flower tip (a small closed star tip would work just as well) and filled that with more pink icing.  I fitted yet another pastry bag with a leaf tip and filled it with the green icing.  Finally I fitted the last pastry bag with a small round tip (like the ones you use for writing) and filled it with the yellow icing.

The best way to fill the pastry bags is to hold it loosely in your non-dominant hand and fold the top edge down over you hand.  Using a rubber spatula or large spoon scoop icing into the bag, trying to get it right to the bottom (don't stress about it though).  Don't fill it too full or icing will ooze out the top.  Fold the top back up and twist it so it closed.  Using your dominant hand apply pressure at the top of the bag, just at the base of the twist to push the icing down into the tip (kind of like a toothpaste tube).

Applying even pressure squeeze the pastry bags to form the different size flowers, leaves and flower centers.  I piped clumps of flowers, added centers, and then finally the leaves.  You can do this in any pattern you want.  I decided to do a sort-of random pattern coming from the top right.  I used the bigger flowers around the top, and slowly switched to using the smaller ones.  As you can see here:


I hope this helped give you some guidance on how to assemble and decorate a truly impressive cake!

Saturday, October 9, 2010

New York Food and Wine Festival

Paula Deen and Michael, aren't they cute?!
Don't worry, I'll post the final step of the Birthday Cake soon, I haven't forgotten about it...but I went to the New York Food and Wine Festival and wanted to share.  I went and got one of Paula Deen's cookbooks signed by Paula and her husband Michael.  Then I headed over to see her cooking demo.  She really didn't cook, instead she spent the whole time talking.  I like that more, because I can watch her cook on TV anytime.  But this was hysterical, she was so cute and funny, as were Michael and Chef Robert Irvine.  And can I just say, Robert Irvine's arms are amazing or as Paula said "he's pretty!"

Robert Irvine

Birthday Cake, step 5

  
The bottom row of scallops.
Now that you have a nicely iced cake, chill it again.  Then you can really decorate it however you want.  May I suggest doing the scalloped edging that most grocery store birthday cakes have.  It's pretty, not too hard, and quite professional looking.  Plus, it covers any imperfections on the edges of the cake.

Basically, there isn't much help I can give you with this...practice is really the key.  Put the left over plain icing in a pastry bag fitted with a star tip that has many points (I use Ateco #32).  Go around the bottom and top edges of the cake making a scalloped edge.  To do this squeeze the bag harder and go slightly backwards, then as you are bringing the bag forwards gradually lighten the pressure on the bag and speed up moving it.  I realize this isn't the most technical language, but hopefully it will give you the idea, and then you can work it out from this base yourself.  I highly recommend practicing before you start on the cake (I did)!  If you mess up a scallop, don't worry it is the same icing as you used for the cake, so you can just try to lift it off and smooth out any excess and redo it.  


Coming soon: decorate the top of the cake.

Thursday, October 7, 2010

Birthday Cake, step 4

  
Please ignore the decoration on the bottom edge, it belongs with the next step, but I don't have a photo of the just iced cake.
Frosting the cake:

Ok, I'm not going to be a huge help on this, I warn you.  You might need a new batch of buttercream to do this, it depends on how much you made for the filling and crumb coat steps.  I personally prefer to make a smaller batch for those steps and then making a second batch to do this.  So now to the actual frosting.  Basically what I do is put a decently large amount of buttercream on top of the cake.  Then I use a large offset spatula to spread it smooth, letting the excess icing go over the side of the cake.  Now spread the icing over the side of the cake, getting more on the end of your offset spatula as you need.  Smooth the sides by holding the offset spatula almost vertical (but not quite) and going around the cake.  Then go back and smooth out the top.

Yes, I know that was rather un-technical.  This is how I do it but probably not how real chefs do it.  And I admit, I'm not great at making it completely smooth yet.  Perhaps that's because I use this not-really-a-method method.  Perhaps it's just because I need more practice.  I suspect it's a combination of the two.

Don't worry if it isn't perfect.  The decorations will hide imperfections nicely.  Anyway, no one cares, they just want to eat it!  To be continued...

Wednesday, October 6, 2010

Birthday Cake, step 3

    
As you can see, the crumb coat is not thick at all, you should be able to see the cake through it, at least if it's chocolate!
A crumb coat is a very important step if you want a professional, clean looking cake.  It is very easy, but a bit time consuming.  The idea is that it will trap all the cake crumbs in so they don't get into the outer, thick layer of frosting.  Also, it smoothes out the cake, so you don't have to worry about that when you are applying the outer layer of icing.

Once you have filled and stacked the cake layers, put the cake in the fridge for about 30 minutes, until it is nice and chilled.  Then use some of the plain buttercream that you made to make the ring on the layers (in step 2) to thinly coat the outside of the cake.  First coat the top, then the sides.  I find the easiest way to do this is using a large offset spatula.  For the sides, I dip the spatula into the icing and spread it onto the cake, rather than putting a glob on the cake and then spreading it out.

Don't worry if you get some crumbs in this layer of icing, they won't show later.  Try to use this layer of icing as a chance to smooth out the surface of the cake.  For example, fill in gaps between the layers, so the sides are straight.

Put the cake back in the fridge and let it chill for, I'd say, about an hour minimum.  I let it chill overnight, because I had the time, but that isn't necessary.  Cut off/smooth out any spots where the frosting is sticking out.  Now you are ready for the thicker, outer layer of icing.  To be continued...

Tuesday, October 5, 2010

Birthday Cake, step 2

I forgot to mention yesterday that imbibing is especially useful if you are making a dry-ish cake like a genoise.  I do it with most cakes even if they are already moist, I just use a lot less liquid so that the cake doesn't become damp.  Personally, I tend to use Frangelico or Chambord but I'm sure other liquors would work well too, just try using what you like.  If you don't want to use liquor you can use simple syrup instead.  I've never tried that, but I'm sure it works because all my cookbooks that discuss imbibing cakes say it does.

Anyway, on to the next step.  I made a batch of buttercream.  I don't do traditional buttercream with eggs, by the way.  I literally cream butter, add lots of powdered sugar, a bit of milk, some flavoring (in this case I used vanilla extract and Frangelico), and usually more powdered sugar.  I wanted it white, but if I don't I add food coloring when I add the flavoring (and more at the very end if I need).  I really don't measure any more, I know what it should look, taste and feel like.  If you want a recipe, check it out here.

I also made a large batch of chocolate ganache (oops, I had far too much left over, but I used it on the spare cake...to be posted later).  I let it cool a bit and then whipped it.  I didn't whip it too much--certainly not enough to get it light and airy--just enough to give it some body.

I piped a thick ring of buttercream around the edge of the cake layers that would be filled with ganache (the bottom and middle layers, not the top layer).  This is a useful step if you are using a filling that is not buttercream because it keeps the filling from oozing out when you put the next layer of cake on top of it.

Then I filled inside the ring of butter cream with a generous layer of ganache.

FYI: The ring probably should have been closer to the edge of the cake, but I've never done this before so I was a little nervous about it oozing out.  In the end I had to pipe more buttercream in to fill the gaps that were left because I made the ring too far in.  
I had plenty of buttercream left over which I used for the crumb coat. To be continued...

Monday, October 4, 2010

Birthday Cake, step 1


Over the next few days I will be posting a step by step guide to decorating cakes.  I admit it may be more a how-I-did-it than a how-to, but hopefully it will be a help if you decide to decorate your own cake!

I baked the cakes.  It took a while because the recipe only made two cakes and I wanted a three layer cake. So I made two batches and had a left over cake (which I will talk about later).

The first thing I did (after baking the cakes, clearly) was level their tops.  To do that I used a very large serrated edge knife and cut off the domed top of the cake so that it was perfectly even across the whole top.  By the way, save all the crumbs in a baggie in the fridge, they're great to snack on!


Then I used a pastry brush to brush a liberal amount of Frangelico liquor on the tops.  Since I cut off the tops the inside of the cake was exposed and the Frangelico soaked nicely into the cake.

To be continued...

Sunday, October 3, 2010

Birthday Cake


As promised, here is the cake I made for my friend's birthday.  Isn't it pretty?!

It was a rich chocolate cake imbibed with Frangelico.  Between each of the the three layers was a layer of whipped chocolate ganache.  The whole thing was frosted with my buttercream.

Over the next few days I will post the whole step-by-step method I used to make this cake, along with lots of photos.  So stay tuned!

Saturday, October 2, 2010

Oops and Coming Soon!

Sorry I've neglected my blog the last couple of days.  I've been incredibly busy!  My 16-year old dog has an inner ear syndrome that makes her dizzy and lose her balance very easily.  She will recover fully, but that can take anywhere from 72 hrs to 2 weeks.  As such, my mom and I have been slightly overwhelmed with vet appointments and keeping the dog upright!

In addition, I'm working on a 1500 word thesis proposal for my undergraduate thesis and a shorter proposal for a shorter (yet still quite large and important) paper.  Plus I still have all the usual reading type homework.

On the plus side, I've still had time to work on the cake for my friend's birthday.  It's coming along nicely and I will be posting quite a bit about it tomorrow (well later today, technically) and the next day.

P.S. For being so critical about the concept of blogging about ones' day to day life and problems, I seem to have started doing that somewhat.  That's worrisome!  Well, I promise, I'll stick mainly to discussing my baking and keep these out of character moments of over-sharing to a minimum.

Wednesday, September 29, 2010

Icing Technique

   
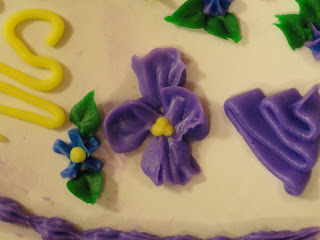
This shows the type of flower and scalloped edging I'm going to use on the cake.
I'm making a birthday cake for my friend's birthday party this weekend.  I've made plenty of cakes before, even a few fancy looking ones (the anniversary cake comes to mind), but I've always avoided using icing to decorate the cake.  This is for two reasons: 1) I often run short on time and don't decorate at all or 2) it seems so intimidating...I mean seriously, you make a whole cake, frost it nicely and then start squeezing complex, colored decorations all over it, if you mess up it could ruin the look of the cake.  But I've decided to plan in advance so as not to run out of time and get over my fears and actually decorate this cake like a birthday cake should be decorated--with shell borders and lots of buttercream flowers.  

In an attempt to get over my fear of decorating a cake with icing (rather than sticking a marzipan flower on top or just using a fun frosting technique to make it look pretty without fiddling too much) I bought a few tubes of ready to use decorating icing.  The brand of icing I get (Wilton) can be used with my nice metal icing tips attached, so they are perfect to use for practice.  Plus, no fussing over making icing and no cleaning up pastry bags.  Here are my attempts at icing decorations.  You'll notice I have not tried to make those beautiful, large, icing roses that are a staple of store bought birthday cakes.  This is not because I have something against them, but because they are quite difficult (and I thought I was starting out with enough for now) and because I don't have any flower nails (what you make the flower on before you transfer it to the cake. 

Hopefully, I'll be able to do this as well on the cake (in a nice design of course).  Oh, by the way, I have yet to determine if I will write on the cake, my inclination is not to, because I don't have the best handwriting with a pen and I'm not terribly steady with the icing writing tip yet.  

The flower in the center is meant to be a pansy...I think it's recognizable as such!

Tuesday, September 28, 2010

Iced Sugar Cookies


I made these over the summer, before I went to Oxford (in other words, back when I was barely posting.)  I'm posting them today because I will not be baking.  I'm sick...or more likely the lactose-free frozen yogurt at school is not made with lactaid-type milk as I'd thought but actually soy-based.  I'm soy intolerant (rather like many people are lactose intolerant) so eating soy makes me ill, rather like I have the flu.  Either way, it doesn't matter, I'm not in the mood to bake (and if it is the flu, I don't want to get people sick.)  Well this was certainly an appetizing discussion!

Anyway, I made these more to practice my icing technique than because I wanted to make sugar cookies.  The cookies were very good, don't get me wrong.  They were from Martha Stewart's Cookies and they were really nice, although a little finicky to work with.  The icing was just a basic powdered sugar and water royal icing.  I used a thin icing tip with the icing still somewhat thick to draw a circular outline on the cookies.  Then I thinned the icing and used a larger tip to pipe some onto the cookie (this is called flood work, I believe).  I used an offset spatula to spread it into a thin layer.  I shouldn't have had to do that, I don't think, but I'm pretty sure I didn't thin it enough because I was a little nervous about making it too runny.  Ah well, they still looked smooth and shiny, like they are meant to.  Plus, they still tasted delicious, so really who cares that the icing was slightly imperfect looking!

Monday, September 27, 2010

Triple Chocolate Brownies, con't

    
Look how dark and moist the center is.  And you can actually see the lovely chunks of white chocolate!
Here's the photo of the triple chocolate brownies.   They look pretty good and they taste even better than they look!

For good measure, let me tell you how I've been serving them.  Well, serving is an overstatement because I've eaten a lot of them out of the pan.  They are incredible plain!  However, they also work nicely with vanilla frozen yogurt (or ice cream, I'd imagine).  Better yet, last night and tonight I had them with cut up strawberries and coffee frozen yogurt (I do the fat-free Stonyfield Farm frozen yogurt, but I'm sure any other brand--or perhaps smooth, plain, coffee ice cream--would work well too).  It is an incredible combination.

Sunday, September 26, 2010

Triple Chocolate Brownies

As I mentioned last night, I made what may just be the best brownies ever.  They are the Snow-Flecked Brownies from the cookbook Nigella Feasts, with a slight alteration to make them the Triple Chocolate Brownies from the cooking show Nigella Feasts.

They are amazing!  The batter has a rather obscene amount of butter and bittersweet chocolate in it.  Mix in sugar, a half a dozen eggs, vanilla, flour and the other two chocolates (semi-sweet and white chocolate chips).  Simple and delicious.  By the way, I'm not a white chocolate fan, but I have to say, I love it in these.  It adds a wonderful sweet almost vanilla-y flavor.  Yum.

What is incredible is that the brownies aren't so much fudgy as they are squidgy (yes, I know that isn't a real word, but it works so well here).  The texture is great, the taste is superb.  Honestly, they really are the best brownies ever.  That said the Roland Mesnier ones still might be my favorite because they are not quite as addictive and are healthier (both lower cal and much lower cholesterol).  But this is brownies we are talking about, so health is not really not what I'm aiming for!

P.S. I'll post a photo soon, but I don't like the ones I took last night and I haven't taken more yet today.

Saturday, September 25, 2010

Breaking News!

I may have just found a new favorite brownie recipe!  Details to follow.

Mexican Hot Chocolate Brownies


These are so named because I flavored my favorite chocolate brownies (the Roland Mesnier ones) with the same spices that are used to flavor Mexican hot chocolate.  They are very good!  I really like spicing things up (no pun intended) by adding different flavors to recipes I use frequently.  It's fun for me to experiment and it makes a nice change from the usual.

The Mesnier brownies I used are cocoa-y and not too sweet, so I thought it would be a perfect recipe to use as a base to make these.  I really did only use the recipe as a starting point and altered it quite a bit.  I left out the nuts, chocolate chips, and ganache topping.  I added cinnamon, chili powder, cardamom and nutmeg to get the Mexican hot chocolate flavor.  I'm still working out the exact amounts of spice (I think it was a little too much cinnamon and not quite enough chili powder), but once I finalize them, I'll post them.


I made these Mexican hot chocolate brownies the same night I made the flourless chocolate brownies that were meant to go to my class.  These went instead.  From the look of things, a few people didn't like them (probably the spice was too much) but many people liked them (judging by the fact that they took seconds and then told me how much they liked them).  My family and friends liked them as well, but they always like what I bake!

Friday, September 24, 2010

Good news and bad news

  
As the title suggests, I have some good news and some bad news.  The good news is, the oven repair man just came and knows exactly what is wrong with the oven and can fix it.  The bad news it, he has to order the part and it will take a week to get it.  I will continue to bake with a malfunctioning oven, but I might be doing less, so I apologize in advance for that.

For anyone who is interested, the large solid state computer chip array (at least I think that's what the man called it!) in the oven is going haywire.  Unfortunately that is the part that controls how hot the oven gets, tells me when it is preheated and works the oven timer.  This explains all the problems I've been having with it!  So next Friday he will come back and replace the part and the oven will be as good as new!  I can't wait.  Until then, I'll cope.

Thursday, September 23, 2010

Flourless Chocolate Brownies, con't


I was not content just to give up on my flourless brownies and relegate them to eat-out-of-the-pan-with-a-fork status.    So, I spread out the cooked fudgy brownie crumble in the pan and put it in the fridge for the whole day.  They now actually have have formed a coherent fudgy brownie.  And they are very, very good!

I'm very happy with them plain, but they are amazing with vanilla frozen yogurt (or ice cream) and berries. Yum, yum!

Wednesday, September 22, 2010

Flourless Chocolate Brownies

I regret to say that these were somewhat of a disaster.  They were simple to make and taste incredible, but never, for lack of a better word, coalesced into brownies.  Instead they remained a somewhat fudgy but unfortunately crumbly mixture.  I don't mind the fudgy-ness, but the crumbly-ness is problematic because it is preventing me from cutting the brownies into proper bars.

I have a feeling that the problem is not the recipe, and not even how I executed it, but actually is my oven.  You see, it has decided not to work properly.  I preheated it to the relatively low temperature the recipe called for and thought everything was fine.  When I checked the brownies five minutes before the time they should have been done they were completely raw.  So I turned up the oven a bit.  That's when I noticed the problem.  It continued to say it was preheated.  Well, just to see what was going on, I turned it all the way to 450* and it still said it was preheated.  If it actually was preheated to that temperature, the brownies would have been burnt not raw.  Consequently, I have to assume something is wrong with the oven's thermometer.  And since the brownies took almost double the cooking time to firm up on top, I'm assuming that the oven is also running quite cool (something I've been suspecting for a while).  I think this caused the brownies to come out odd and rather un-brownie like.  Once my oven is fixed I'll have to try these again, I'd imagine they will be quite good (especially since they taste good now)!

Luckily the edges firmed up enough to salvage a few brownies.  Normally, this wouldn't be such a priority.  You see, I have no objection to eating this not-so-much-a-brownie out of the pan with a fork (or, since I want to feed it to my mom and pops as well, scooped out of the pan onto a plate before being devoured).  However, I made these because I was hoping to bring them to my class tomorrow and my teacher cannot eat gluten so I wanted these to work.  I couldn't save enough to feed the class, but I did get enough proper bars out of it to give to my professor.

As for the class, I sacrificed the freshly baked Mexican Chocolate Brownies I made for myself (I'll post them tomorrow).  They are currently sitting in a tin ready to be transported and eaten.  It is quite sad, really.  I'd planned on freezing them for myself so I'd have brownies in the house again (I'm out of my favorite chocolate brownies).  But I suppose it will all be worth it when I see how happy they make classmates (hopefully).  Plus, I can always make another batch.  Actually, this may be good, I'm thinking of trying to create an Orange Chocolate Brownie, this will give me the perfect excuse to get right on that!